

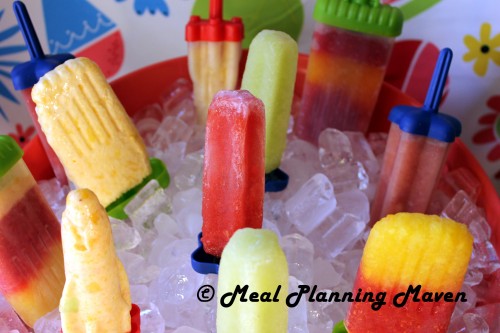

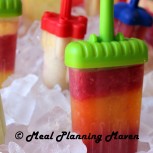
Homemade Frozen Fruit and Yogurt Pops
What screams summer louder than juicy frozen fruit and yogurt pops melting in your mouth? Making popsicles is bunches of fun for the whole family…not to mention, so much healthier and far less costly than those found in supermarkets. The sky’s the limit when it comes to choosing yummy fruit combos so do take advantage of summer’s bounty. No special equipment needed except paper cups and popsicle sticks. Or look around for fun-shaped molds…or maybe even try one of those frozen pop makers that freeze your homemade creations in about 10 minutes!
Yield: 6-8 popsicles
Yield: 6-8 popsicles
Ingredients
- 2 cups chopped frozen fruit like honeydew, mango, kiwi, watermelon, cantaloupe, peaches, bananas, pineapple, etc.
- 2 cups yogurt plain or flavors sweetened with 100% fruit or honey (see MPM Mini-Bites
- About 2 tablespoons 100% fruit juice if needed
- Popsicle molds or paper cups and popsicle sticks
Instructions
Making Pops
<br>
- Place fruit in a food processor blender. Process till almost smooth with small chunks remaining.
- Add yogurt and process until semi-smooth. If mixture is too thick, add just enough fruit juice to make a pourable semi-chunky puree.
Assembling and Freezing Pops:
- Pour popsicle mixture into paper cups or molds. Leave about 1/2-inch to allow for expansion during freezing. If using paper cups, place a popsicle stick in each cup when semi-frozen, at least 3 hours. If using molds, place stick in mold and fasten top.
- Freeze UNDISTURBED for a minimum of 8 hours (overnight would be preferable!) Do not keep running to check on your pops as every time your freezer is opened as the temperature rises!
- To remove pops, for paper cups, just peel away cups and enjoy! For molds, run under warm water for about 20 seconds, twisting stick gently until pop easily slides out.
Notes
Make Ahead and Storage Tips: store pops in cup or molds for up to 3 months.
All ingredient measurements are approximate. You may need to adjust the amount of fruit and yogurt based on the size of your cups and molds.
To make layered pops: loads of fun to make, but do allow extra time for individual layers to freeze. Fill a paper cup or mold halfway (or can do thirds) with desired pop mixture. Allow at least 4 hours before adding the second and/or third layer. Be creative! Mix up colors and textures by alternating different fruit combinations with yogurt mixtures.
A note about sweetening: these homemade pops contain very little added sweetening. Feel free to adjust to your family’s tastes, adding a bit more honey if desired. When using yogurt, if too tart, either sweeten by stirring in a bit of honey or look for naturally sweetened yogurts such as Honey Greek Yogurt and Apricot Mango Greek Yogurt available at Trader Joe’s.
These popsicles are all-natural and therefore do not contain preservatives and stabilizers like found in most commercial products. So make sure you serve them immediately after removing from the freezer or they will melt rather quickly! Also, for the same reason, don’t be surprised if when removing pops from molds or cups one or two break in the process….they’re still just as much fun to eat with a spoon!
Prefer to skip the yogurt? Try Homemade Frozen Fruit Juice Pops and Homemade Frozen Fruit Pops.


1 Response